

Hello, In this article, I will talk about terraform foundations. If you want to have a basic knowledge of Terraform, this article may be useful for you. In this article, we’re going to create, update and terminate an AWS EC2 instance. You can also read the Turkish version of the article from my medium account
Terraform is an infrastructure as code tool developed by Hashicorp using the Go programming language. It allows you to manage the infrastructures of your applications. For example, instead of manually setting the services such as load balancer, security group, database, ECR that a microservice needs on AWS, you can code these operations via Terraform. In this way, human errors can be reduced and the infrastructure monitoring of your applications becomes easier. Especially when working with crowded teams, it becomes difficult to follow the updates made in cloud services. Thanks to infrastructure as code, you can both follow what has been done in the past through a version control tool and pass the latest changes through control mechanisms such as code review. In addition, Terraform can work not only with AWS, but also with other cloud service providers such as Google Cloud, Azure. You can find sample usage scenarios here
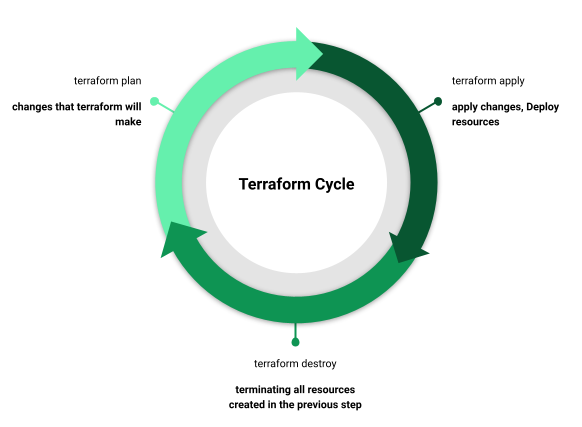
Now let’s make an example with an EC2 instance on AWS. First of all, let’s create an EC2 using Terraform and terminate EC2 completely. So let’s complete the following loop.
Terraform Configurations
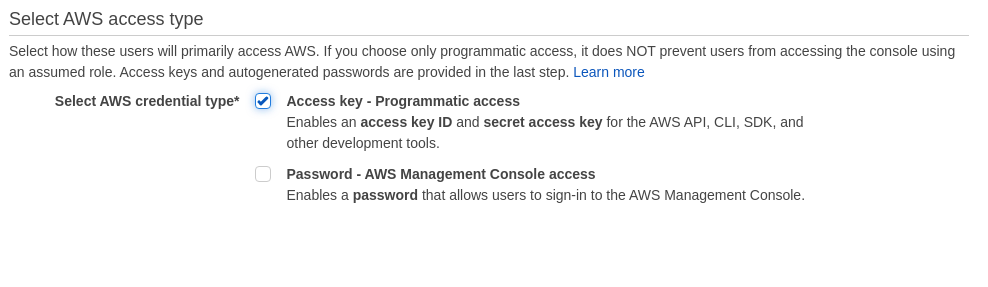
First of all, we need to install AWS CLI and Terraform on our computer. Then we need aws_access_key_id and aws_secret_access_key to access AWS. In this step I prefer to create an AWS IAM user so we have a Terraform specific AWS user and we can disable this user if needed. To create an IAM user, firstly create an IAM user from the users tab of the IAM (Identity and Access Management) service on the AWS console. In this step, as you can see in the image below, I do not give console permission because we will not need it.
Then we choose the privileges of the user we created. At this stage, I created a user with the policy named AdministratorAccess. After creating the user, there are Access Key Id and Secret Access Key on the screen (You will not be able to see this information again after you close the page). Now we need to create a file named credentials and write the secret access key id and secret access key into it. After this process, the file content should be as follows:
[default]
aws_access_key_id = your_access_key_id
aws_secret_access_key = your_secret_access_key
The file we created should be located in the “%USERPROFILE%\.aws\” directory if you are using Windows, and in the “$HOME/.aws/” directory if you are a MacOS or GNU/Linux user. You can find more detailed information about these parts in this document.
cd .aws
>> credentials
After running the above two commands, type the file content into the terminal and press ctrl+c, the credentials file will be ready to use.
Getting Started to Terraform
We have completed our installations and now we can start building the infrastructure of our application. As I mentioned at the beginning of the article, we will create an EC2. I will use Visual Studio Code while doing these operations. I use this plugin.
First we create a main.tf file. This file can be thought of as a main function in any programming language. This file contains blocks for different tasks. The first of these is the terraform block.
The terraform block is used to configure the terraform itself. For example, the version to be used, Terraform Cloud or Terraform backend settings are made in this block. Only constant values can be used. Variables or other blocks should not be used within this block. In our scenario block will be like this:
terraform {
    required_providers {
        aws = {
            source  = "hashicorp/aws"
            version = ">= 3.20.0"
        }
    }
required_version = ">0.14.9"}
Then we create a provider block to make specific settings for the cloud provider we will use:
provider "aws"
{
    profile = "default"
    region = "eu-central-1"
}
In the last step, we create an EC2 instance. The “aws_instance” refers to EC2. You can think of app_server is a variable name in any language. In this case, the left one (aws_instance) can be considered as the type of the variable.
resource "aws_instance" "app_server"
{
    ami            = "ami-015c25ad8763b2f11"
    instance_type  = "t2.micro"tags = {
     Name = "ExampleAppServerInstance"
    }
}
Now that we’ve completed the preparations, we can create an EC2. Currently we only have one main.tf file and its content like this:
terraform {
required_providers {
aws = {
source = "hashicorp/aws"
version = ">= 3.20.0"
}
}
required_version = ">0.14.9"}provider "aws"
{
profile = "default"
region = "eu-central-1"
}resource "aws_instance" "app_server"
{
ami = "ami-015c25ad8763b2f11"
instance_type = "t2.micro"tags = {
Name = "ExampleAppServerInstance"
}
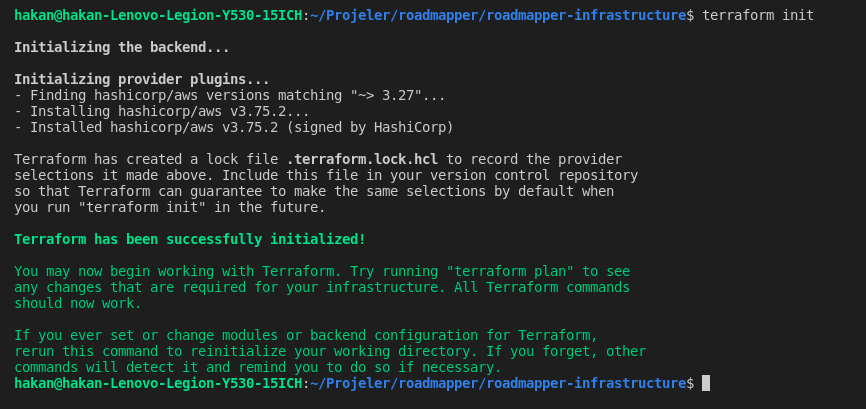
}After creating our main file, there is the next step to download the requirements to be used. In this step, we run the terraform init command. When we do this, the .terraform folder and the terraform.lock.hcl file are created.
.terraform: In this folder, used packages are stored. In this way, there is no need to download all the packages every time.
terraform.lock.hcl: This file saves the versions of the dependencies used and allows everyone to work with common versions. If you add this file to your version control system, you can facilitate teamwork as everyone will be using the same versions. You can also update the packages here with the terraform init -upgrade command. You can find detailed information about this file from this link.
In the next step, we run the terraform plan command. After running this command, we encounter a long output. Thanks to this command, we can see the changes that will occur when the terraform code runs.
When you run the terraform plan command, you will see an output that starts as follows. In this output, parts starting with “+” will be created, “-” ones will be deleted and “~” ones will be replaced. Since we haven’t deployed this code yet, there are currently no resources. That’s why they all start with “+”.
Terraform used the selected providers to generate the following execution plan. Resource actions are indicated with the following symbols:+ createTerraform will perform the following actions:# aws_instance.app_server will be created+ resource "aws_instance" "app_server" {+ ami                                  = "ami-015c25ad8763b2f11"+ arn                                  = (known after apply)+ associate_public_ip_address          = (known after apply)+......
}Plan: 1 to add, 0 to change, 0 to destroy.──────────────────────────────────────────────────────────────────────────────────────────────────────────────────────────────────────────────────────────────────────────────────────Note: You didn't use the -out option to save this plan, so Terraform can't guarantee to take exactly these actions if you run "terraform apply" now.
This output is of vital importance to us. For example, if you are managing a database, all your data can be deleted in seconds as a result of an incorrect operation. Or your application may become inaccessible with a change in the rules of the Load Balancer. That’s why it’s very important to carefully examine the output of the terraform plan command, although it is long.
Note: You didn’t use the -out option to save this plan, so Terraform can’t guarantee to take exactly these actions if you run “terraform apply” now.
I’m skipping the note at the end of the printout you see above, but if you’re curious, you can find detailed information here.
Lets Get Apply The Code
Now we are ready to run the code 🎉 We run the terraform apply command to deploy the previous plan. After running the command, we first see the plan in the output, then it asks us for confirmation as in the picture below.
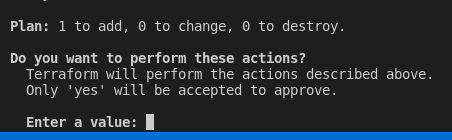
After giving approval, EC2 starts to prepare. Depending on the code you wrote, the working time may vary. We don’t expect it to take long as we only want an EC2. If it completes without error, we expect to encounter an output like the following:

Now that the process is complete, we can see the created EC2 on the AWS Console

An EC2 instance has been created, but the task of terraform does not end here. For example, you wanted to change the type of our EC2 machine. You can still do this using terraform. For this, the terraform.state file that is created after running the terraform apply command is very important for us. Thanks to this file, we can make changes on the infrastructure we have prepared now, and we can stop all of them if we want. For example, if we run the terraform plan command now, we should see an output like the one below.

When you run the terraform plan command:
- It is checked whether the terraform.state file is up-to-date by comparing the status of the currently running services with the status of the terraform.state file
- The effects of newly added parts of the Terraform code are checked
- Terraform plan output is created
So for our scenario, an EC2 is currently running and we haven’t made any changes to our code. In this case, the terraform plan does not show any change as seen in the output above.
The last step of the terraform cycle is terraform destroy command. With this command, we will terminate all the resources we have opened. This process can be very dangerous. You can delete the entire infrastructure of your project in seconds. Still, I think it’s a useful command. For example, manual shutdowns can cause major errors that affect other services. Terraform destroy may be a safer option at this stage.
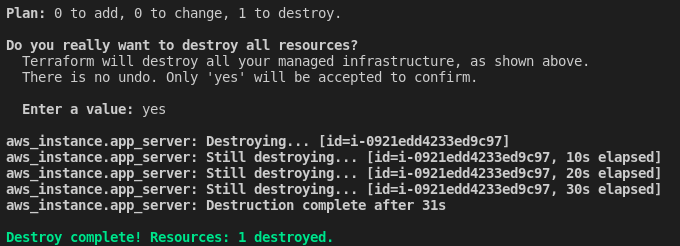
As in the apply command, it asks us for confirmation. When we run the terraform destroy command, we encounter a confirmation step after a plan that shows the resources to be deleted as follows.
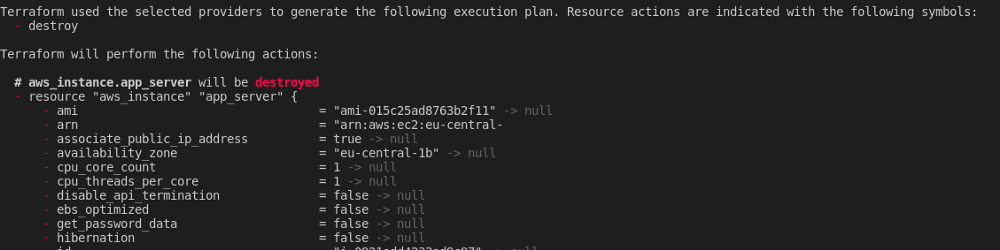
After confirming the destroy operation, terraform writes the current operation periodically. There is an important point here. Terraform is creating and terminating resources in a specific order in both the apply command and the destroy command. (terraform destroy actually means terraform apply -destroy) This order is important because sometimes in order to delete a resource, its dependencies must be deleted.

Thanks for reading, I hope it is useful for you. You can also check out my other articles. Goodbye!
Reference
Terraform Settings – Configuration Language | Terraform by HashiCorp
Search Terraform documentation The special terraform configuration block type is used to configure some behaviors of…www.terraform.io
Build Infrastructure | Terraform – HashiCorp Learn
With Terraform installed, you are ready to create your first infrastructure. In this tutorial, you will provision an…learn.hashicorp.com
Lock and Upgrade Provider Versions | Terraform – HashiCorp Learn
Terraform providers manage resources by communicating between Terraform and target APIs. Whenever the target APIs…learn.hashicorp.com
Dependency Lock File (.terraform.lock.hcl) – Configuration Language | Terraform by HashiCorp
Search Terraform documentation Note: This page is about a feature of Terraform 0.14 and later. Prior versions of…www.terraform.io
Leave a Reply